Pi Morse
By Luke Miller
- 6 minute read - 1152 wordsDash dash dot dot! This project combines a Raspberry Pi mini computer with USB-connected peripheral devices - a simple button and a basic speaker - to create a functioning Morse code keyer that works from switch-on time.
This fun side project combines hardware and software to create a wonderful, tactile educational device that practices several skills at once: listening, concentration, coordination. This device has certainly been a hit with my children! In this article, I’ll describe how I built the project and walk you through some of the key concepts involved.
Without further ado, here is a short clip of it in action (sound on!):
Do drop a star (⭐) on the GitHub project page if you enjoy reading this article, or if you managed to replicate the project successfully.
The Hardware
Here is a list of equipment needed to make it happen:
- Raspberry Pi 5 with 2GB RAM (~£50);
- [Pi case with fan (~£8), optional but aesthetic];
- USB single push button (~£12);
- small USB speaker (~£10);
- micro SD card with 32GB storage (~£10);
- power adapter (£0?).
As you can see the costs here do mount up to a hefty sum. The Pi itself is the most expensive item, and there are some shortcuts you can make here (limit to 1GB RAM, or use an older model or second-hand device), but ultimately it is a computer, albeit a small one. You could also use the space bar of a wired keyboard if you happen to have one lying around, instead of buying a bespoke button like I did.
You can buy a dedicated power adapter for the Pi - which is not necassarily included in the box - but I got lucky with an adapter at home. You will need to meet a certain power requirement, so you need >3A plug adapter and a USB-C to USB-C cable. Anything less than that didn’t seem to cut it.
Another thing worth noting: use at least 32GB of disk. I originally tried to use an old 8GB USB stick to run the OS, but it failed to boot up every time. (That size worked for an older generation of RPi, but the requirements have clearly grown since.)
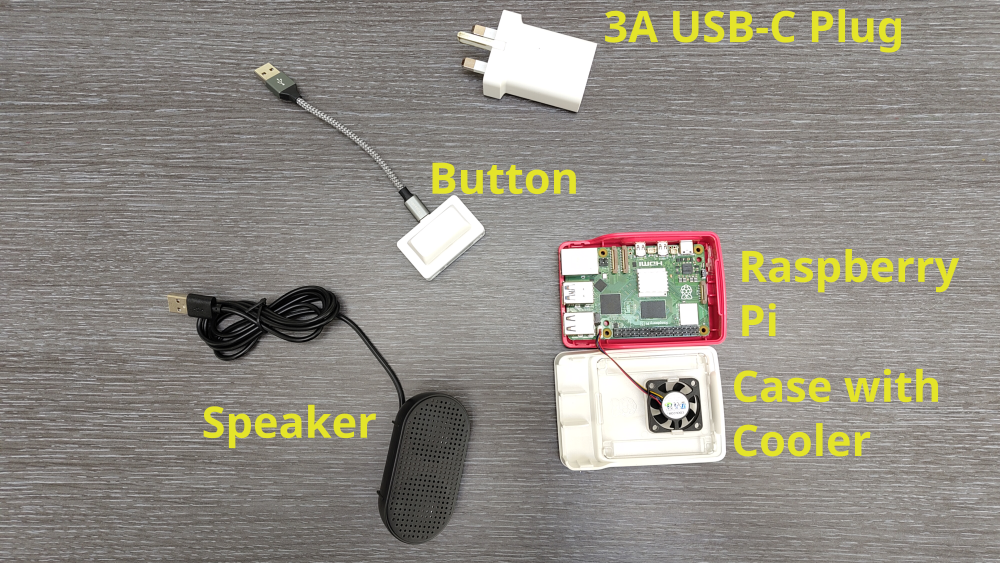
Note: one component not shown in this image is the SD card, which had already been slotted into place.
Incidentally, a cheaper route that I investigated was to go with a microcontroller (such as an Arduino) and adapt the peripherals accordingly (no USB, for example). I decided against this route, partly because it’s far out of my know-how, would involve soldering or breadboards, but also because the Raspberry Pi can be re-purposed for other projects later on. This is a valid route, it just wasn’t for me.
The Keyer Code
The heart of the project is the script morse.py, which does one job: sound a tone for exactly as long as the button is held.
The challenge is that the program cannot know in advance how long the button will be held for, and so has to translate the
button state on the fly using simple boolean logic and emit the tone depending on the answer.
To this end, we use the Sidetone context manager class to hold open a stream to the appropriate sound device that stands for
our USB speaker, and it is responsible for sending the appropriate sound data, depending on the button’s state which in turn is
determined by the sequence of press and release events. When engaged, the Sidetone’s callback function plays an oscillation
with additional “ramping” up or down when it needs to change state (in order to avoid hard clicking sounds at the boundaries).
On the input side, the evdev library reads raw key events straight from the
kernel’s /dev/input/by-id/ nodes, filtering them to determine whether the button’s state has changed.
To run the program, you can run it manually using the following command noting the input and output devices:
$ python3 morse.py --audio UACDemo /dev/input/by-id/*XFKEY*event*
UACDemoV1.0: USB Audio (hw:2,0) @ 48000 Hz, 600 Hz tone
Hold the button to key. Ctrl-C to quit.

. (78 ms)
. (81 ms)
. (74 ms)
- (216 ms)
. (77 ms)
Note: the input --audio is specific to your own setup and the name of the attached speaker device: use aplay -l
from the terminal to see available sound devices.
Helper Scripts
I’ve kept two diagnostic scripts around that originally helped me interrogate the hardware, and they remain useful for
anyone setting this up with their own peripherals. detect_button.py watches your input devices and prints every
event as it arrives - useful for discovering the input mapping and which key is actually firing. detect_speaker.py
lists what PortAudio can see and plays a fixed test pattern through a device of your choosing.
A few hard-won tips from that detective work:
- Prefer the symlinks under
/dev/input/by-id/over raweventNpaths - the numbering can shuffle between reboots, whereas the by-id names stay put. - PortAudio numbers audio devices its own way, and those indices do not match the card numbers from
aplay -l- matching on a name fragment (mine calls itself “UACDemo”) is much safer. - If you get silence, check the mixer before questioning your code:
alsamixer -c 2, then pressMto unmute, or up to increase volume.
Always On: systemd
It’s a good idea to have the keyer python script load shortly after boot time, rather than having to rely on starting it
manually every time. I created a systemd service “morse” whose config is shown above. If the service is not running
for any reason (for example, the computer has just powered on), then systemd will bring it up.
There is a companion setup bash script that you can follow to get this set up yourself, which essentially just involves:
- copying the service’s config file to right place
- registering the service with systemd.
On boot, it will take 5-10 seconds to become live, and you follow the script output with the terminal command:
journalctl -u morse -f
Conclusion
In this project, I used a Raspberry Pi, a USB button and a tiny speaker became to create a simple but fun device to practice Morse code with. It uses bespoke Python code to constantly poll the state of the button and to send the corresponding tone to the speaker, and a little bit of Linux magic (systemd) to make that process ready as soon as it boots up.
This project has resparked my interest in building these hobby devices, and has certainly got me thinking about what could be next for the Raspberry Pi. Watch this space.
If you enjoyed reading about this project, please hit the ⭐ button on the GitHub page. And if you do manage to build one yourself, do let me know via the contact page (or use it to send an SOS!).